Getting Started with EasyRx Practice - Step by Step Guide
Welcome to EasyRx
We have put together this guide to help get started with your
EasyRx Practice account. We know you are eager to start getting
productive - these are the first steps to getting yourself acclimated
with your new EasyRx account. This article will cover information for all
Per-Script, Standard, Standard + 3D and Premium Practice users. For Premium users,
please visit our other article on "How to setup my in-house lab" to
complete your setup process.
Also, note we have a free and fun
video tutorial library called "EasyVids" that also go through most of
what's in this guide (if you prefer a more animated way to learn). Access our cool EasyVid video series here. They walk through virtually everything you can experience in EasyRx!
 Quick note: EasyRx
works perfectly if your office submits Plaster Models / Impressions, if
you take digital scans, or a blend of both! You can use your one EasyRx account
regardless of how you obtain your models.
Quick note: EasyRx
works perfectly if your office submits Plaster Models / Impressions, if
you take digital scans, or a blend of both! You can use your one EasyRx account
regardless of how you obtain your models.Introduction:
Before
you get started, it's important to know the architecture of EasyRx- it
is a cloud-based platform meaning you can access your account from
virtually anywhere, from any device, at any time. We only require you
have an internet connection, and one of the latest browsers of FireFox,
Safari, Chrome, or Internet Explorer. Please note we highly recommend
using Google Chrome as it seems to be the fastest / most responsive browser with EasyRx.
Getting logged into your account:
When
you signed up for EasyRx, we would have sent an automatic email to the
email address you used during your sign up. Check your email for a
validation email. You may want to check your spam and junk folders as
well. The email contains a link that will allow you to login for the
first time, set your password, and ultimately go through the rest of the
guide. You can access the login page at
https://login.easyrxortho.com/ Be sure to save a shortcut to your desktop or bookmark it on all your workstations to make accessing the login page simple.
If you have trouble accessing your account, call our support at 1-888-340-3751 x2 or email support@easyrxcloud.com, our support team is always available to help you and your staff so keep this info handy just in case you need an extra hand.
You are logged in for the first time, now what:
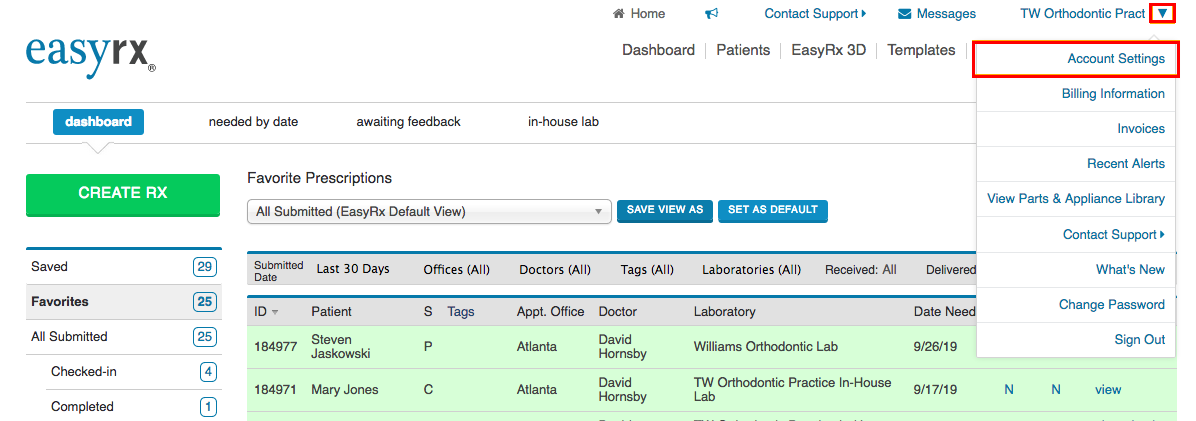
We recommend before starting to create your first prescription, you go through your Account Settings to set some important configurations. You may have done this during your initial sign up, but to be safe we will cover it in this article. Access the drop down menu on the top-right of the screen and choose [Account Settings] as seen in the image below.
Here is a quick checklist of items to review to get you started and get your first Rx submitted:
If you have trouble accessing your account, call our support at 1-888-340-3751 x2 or email support@easyrxcloud.com, our support team is always available to help you and your staff so keep this info handy just in case you need an extra hand.
You are logged in for the first time, now what:
We recommend before starting to create your first prescription, you go through your Account Settings to set some important configurations. You may have done this during your initial sign up, but to be safe we will cover it in this article. Access the drop down menu on the top-right of the screen and choose [Account Settings] as seen in the image below.
Here is a quick checklist of items to review to get you started and get your first Rx submitted:
- Practice Profile
- Clinic Staff
- User Accounts
- Security and Compliance
- The EasyRx Universal Library of Parts and Appliances
- Connect with Labs
- Creating a Prescription
- The "Create Rx" form
- Prescription Workspace
- Using the Library of Parts and Appliances
- Using Templates
- The "Create Rx" form
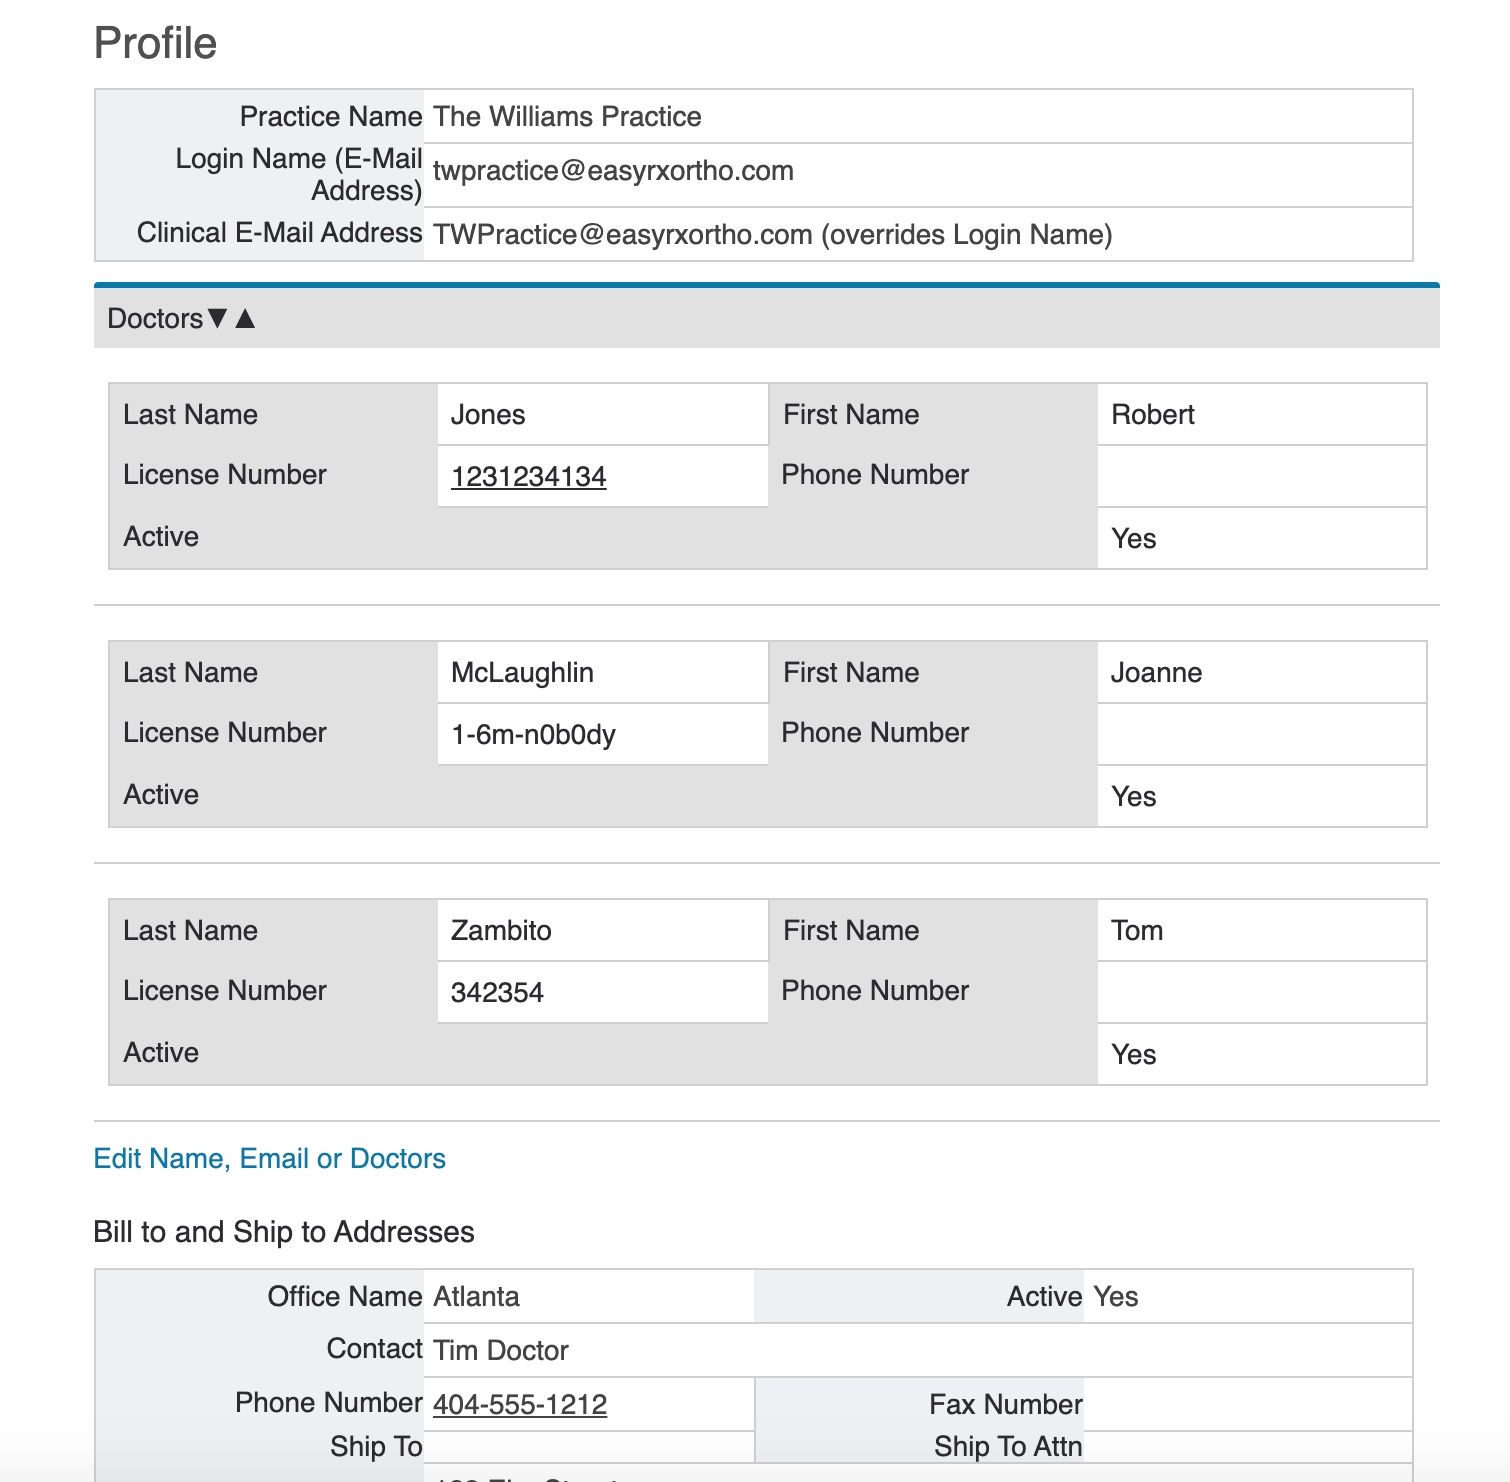
Practice profile - Let's add doctors and office locations:
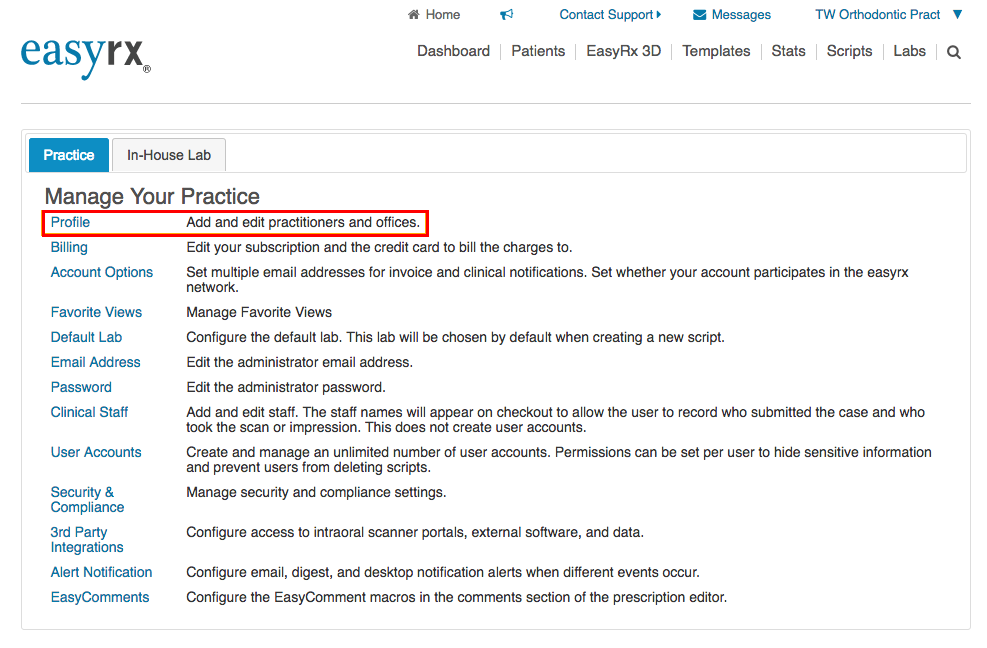
After clicking Account Settings, go into "Profile" as seen below.
Go through the following options to make sure your information / doctors / locations are up-to-date:
Next, let's go back to the Account Settings menu and select "Clinical Staff":
After clicking Account Settings, go into "Profile" as seen below.
Go through the following options to make sure your information / doctors / locations are up-to-date:
Next, let's go back to the Account Settings menu and select "Clinical Staff":
NOTE: This
does NOT create a new account or login--these become menu drop down
choices when you create a prescription so you can select who would be
assigned to doing impressions or scans and who is submitting the case.
This is a simple but handy way to internally track which staff member was
assigned to those tasks.Important note for Doctors / Administrations: You
can check the "Require Clinical Staff" box if you want to make it
required when a new prescription is being created, that the user must
choose a name for who took the impression and who will be submitting the
case. If the box is left unchecked, the names are optional. Next, lets go back into Account Settings and let's choose the option called User Accounts:
This
is where we would create logins for staff members to be able to log
into EasyRx and assign permissions. You can create as many users as you
want--so as your use of EasyRx increases or your practice grows, you can
bring on board as many staff members to use EasyRx as you like.
This not only
adds a layer of accountability for when your staff uses EasyRx, but also
provides you the ability to message your users with our new "Message
Center" feature where you can internally communicate with your staff!
This helps consolidate your communication in our secure cloud
environment. For Premium users, you can also appoint users as In-House
Lab Technicians.
Having users also allows you to see which user
comments on an Rx and edits or creates an Rx. We show a "revision
history" on every Rx when viewing one.
Next you can check out who currently has logins / accounts for EasyRx, view/edit them, or just create a new user!
By
default, you will not see any User Accounts unless you create them.
User accounts can only be created and managed by your main /
administrator login.
NOTE: You will want to
disable access for employees that leave the practice. Simply mark those
employee's accounts as 'inactive' and save. You do not want to delete
the user because EasyRx tracks previous prescriptions and who
created/edited it, you still want their record in EasyRx to track them
if needed down the road.
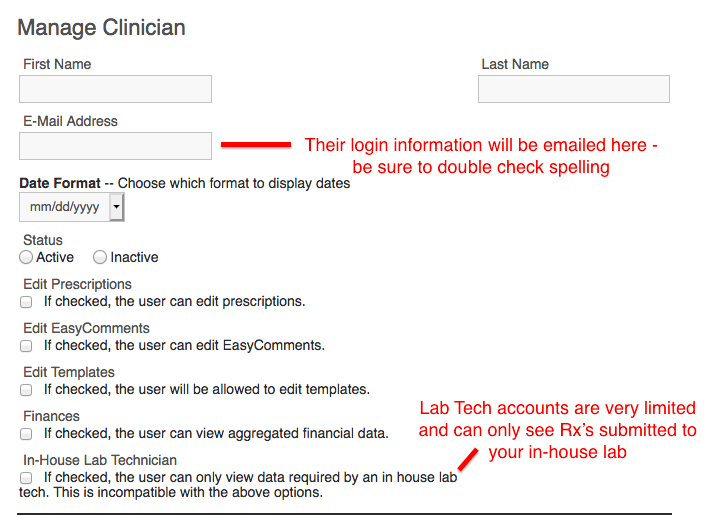
Lets create a User Account: Start by clicking the "Create New Clinician Account"
Go
through the different fields and permission check boxes, fill them out
as needed. See image below for some special notes. These are subject to
new enhancements as we update EasyRx with more settings in our monthly
updates.
Be sure to hit "Save" after you create each clinician. They
will get an automatic email from "support@easyrxortho.com" showing
their login and temporary password. They will be able to assign a new
password once they log in for the first time. This should go to the
users email inbox but on rare occasions, it may end up in their Junk /
Spam folder so be sure to check there if needed.
New users will
have access to a majority of the basic functions like viewing Rxs,
adding comments, sending messages, with the exception of admin-only
functions like changing the credit card on file, changing your EasyRx
plan, deleting your account, and adding or editing other user accounts.
This helps keep your EasyRx experience safe and organized.
Setup Security and Compliance settings
As
part of the initial setup, we advise you to go into "Security and
Compliance" section in Account Settings and review a couple settings.
1.
Enable HIPAA Compliant Password Rules - When this is enabled, EasyRx
requires passwords to meet the HIPAA recommended password requirements,
which are:
- Minimum length of 8 characters
- The password must contain one upper case, alpha and numeric and a special character
When
this option is enabled, the next time uses log in, they'll be prompted
to change their password to meet minimum requirements.
NOTE: The default password requirements is minimum of six characters. 2.
Password Expiration - Set the interval, in days, when users will be
prompted to change their password. This is very important as it impacts
your compliance to HIPAA guidelines. HIPAA recommends every 60 days.
Great job! So far you've setup quite a few essentials to help your EasyRx experience go smoothly!
The EasyRx Universal Library of Parts and Appliances:
By
default, all practices are assigned the EasyRx Universal Library of
Parts and Appliances. This is a library of over 500+ standard parts and
appliances. The library, for example contains everything from Herbsts,
RPE's (sometimes referred to as RME's or MEA's), Clasps, and a laundry
list of parts and appliances that your office can instantly use on your
prescription. You can customize the library, create templates and use
the library to create and save prescriptions. You can also print out
prescriptions created using a lab called the EasyRx Universal Library.
This lab is a placeholder that allows you to create lab slips to print
out and mail/fax/email to any labs that are not connected through
EasyRx.
Prescriptions created using the library show in the Prescription Dashboard in the Saved category. The only limitation is you can't use the Universal Library to submit a case. You can, however, change the lab when creating the prescription to any of your other Connected EasyRx labs to proceed to submit the case. Doctors will normally choose the Universal Library Lab to create an Rx and decide later which lab they want to submit to. You will get the most benefit of using EasyRx with labs that accept EasyRx cases. We'll explain a few lines down how we can help your lab onboard to use EasyRx.
Prescriptions created using the library show in the Prescription Dashboard in the Saved category. The only limitation is you can't use the Universal Library to submit a case. You can, however, change the lab when creating the prescription to any of your other Connected EasyRx labs to proceed to submit the case. Doctors will normally choose the Universal Library Lab to create an Rx and decide later which lab they want to submit to. You will get the most benefit of using EasyRx with labs that accept EasyRx cases. We'll explain a few lines down how we can help your lab onboard to use EasyRx.
Connect with Labs:
Let's
connect to labs so you an submit prescriptions. When you first signed
up, you would have chosen one lab that uses EasyRx to connect with, you
are instantly connected with that initial lab! For
example, during sign up you chose Specialty Appliances, you will already
have them in your lab drop-down choice when creating a prescription.
The beauty of EasyRx is that is gives you one universal lab prescription form you can use to submit to any lab
you want. Herbsts, RPEs, Aligners, Indirect Bonding cases, you-name-it.
You will no longer have to download your lab's PDF or print out their
appliance forms.
If you want to choose or add other labs to also send cases to:
Go to Labs from the menu bar. At the top of this page, you'll see "My Labs". These are the labs you are currently connected.
If
you were invited by a specific lab to use EasyRx, the network of other
EasyRx Connected labs is likely hidden by default. You can call us to
enable this. 1-888-340-3751 x2. If your lab is covering your EasyRx fees
as part of your "Per Script" account, you will be provided some
important information when connecting with other labs.
In-House Lab
If
you have an EasyRx Practice Premium Account, you will automatically be
connected with your In-House Lab. You'll see it listed under "My Labs".
NOTE:
Per-Script, Standard, and Standard + EasyRx 3D plans do not have access
to in-house lab features so consider checking out our Premium plan for
this functionality. Buzz our sales at 1-888-340-3751 x1 if you'd like a
quick web demo and to review the cost to upgrade. Upgrading can be done
in a few seconds!Connect with an EasyRx Connected Lab:
One
of the cool things about this software is it is very easy to connect
with any lab using EasyRx. We call labs that accept EasyRx cases as
"EasyRx Connected Labs", your practice can request to submit to one of
these labs by going to [Labs] and review the EasyRx Connected labs
section Find the labs you'd like to connect and click "Connect to this
lab"
This will send a request to the lab to allow you to connect
with them. Once the lab accepts your request, you'll see this lab listed
under "My Labs". And you'll be able to create and submit prescriptions
to this lab, including automatically giving you access to that lab's
customized library of parts, appliances and templates. And If the lab
has set pricing on their parts, you will also see pricing when creating
your prescriptions (we will show you this later). Some labs using EasyRx
have their acrylic color chart available you are creating a
prescription in EasyRx-- now that's sweet!
Invite a lab to connect:
If
you don't see a lab on the current list of EasyRx Connected Labs you
want to connect, you can easily invite a lab to sign up. Just click on
the [Invite Lab] button which opens a templated email to invite a lab to
sign up. You can edit the email before sending. Once the lab receives
the email, they will need to create an
account and choose their preferred subscription plan. There are 3
different plans available: Connected, Standard, Enterprise. The Connected option allows the lab to sign up and use EasyRx as a lab for free! Standard and Enterprise are more integrated solutions that are available
at different monthly rates. We are happy to answer questions your lab
may have and work with your lab to show them the benefits, we provide
some cool web demos and resources to show labs how remarkably easy it is
to use the EasyRx Lab application.
You can give us a buzz at 1-888-340-3751 and we will be happy to reach out to your favorite labs to get them on board if they are not using EasyRx. We even provide new labs free support and training to make sure they process your cases seamlessly.
You can give us a buzz at 1-888-340-3751 and we will be happy to reach out to your favorite labs to get them on board if they are not using EasyRx. We even provide new labs free support and training to make sure they process your cases seamlessly.
To access the "Invite Lab" button, click [labs] from your dashboard page, then click the green "Invite Lab" button.
I invited a lab to connect but nothing has happened yet?
Your
lab should respond to your request usually within a day or so. If you
haven't heard back - give them a quick phone call to advise them you
sent a request to connect with them through EasyRx.
You can also call us at EasyRx at 1-888-340-3751 and we will ask your lab to approve the request.
What happens when I am connected with a lab?
You'll
see the lab listed under "My Labs" and that respective lab as an option
to submit prescriptions to when you create a new prescription.
Creating a Prescription:
Now
the fun part! You can create a Prescription from the Dashboard, via the
[Create Rx] button or when viewing an individual patient via the
[Create Rx] button
Let's go back to the Dashboard and Create an Rx!
The next screen is when you enter all the basic information about your patient, respective staff, and create your prescription:
If
a patient with the same last name already is in EasyRx, the first or
last name field will suggest an 'auto fill'. If the patient doesn't
exist, once you 'create prescription' the patient will be added to
EasyRx and can be found under the 'Patients' tab on the EasyRx menu
bar.
- Under the [Laboratory] drop-down, choose the lab to submit the prescription or choose
the EasyRx Universal Library of Parts and Appliances. Choosing this
Library will allow you to create, but not submit, this prescription.
Comes in handy if you need to create the Rx but aren't sure which lab
you want to send it to yet.
- For [patient ID]: Enter the ID from your practice management system, you can use this to lookup patients, if preferred.
- Some
of the fields in the form are optional, including the Date of Birth. We
highly recommend entering the Date of Birth. For example, if you have
two patients named John Smith in EasyRx, the date of birth helps
distinguish the difference, specially if you choose not to or forget to
include the External patient ID.
- If
your account settings made [Staff who made impression] and [Staff who
submitted case] required, you will not be able to create the
prescription without assigning names to those two fields.
Click [Create Prescription] after filling the necessary fields to continue on to creating the prescription
This is where all the magic happens and you are able to create, edit and add virtually any instruction, drawing, or lab item to your Rx.
This is where all the magic happens and you are able to create, edit and add virtually any instruction, drawing, or lab item to your Rx.
In
the
example screen shot, I've put together a Hawley Retainer for my patient.
The Prescription Workspace is fully interactive meaning
you can move parts, drag-and-drop items, click on menu options to add
comments, set part options, acrylic colors, and so much more.
On
the left side you will see [Parts, Appliances, and Templates] - here we
house the Universal Library of Parts, Appliances and Templates. If
your lab you are connected to has custom parts, they will show those
options as well, parts and appliances may vary slightly depending on
which lab you are sending the prescription to. The interface is a tree
view -- to find a part, appliance or template, just click on the
appropriate item to see what is below. Or you can use the [Search] bar
to find items if you are not sure where to navigate to find them.
Once
you find the items you want, you can hover your mouse over the Camera
icon, to give you a preview of what the drawing looks like.
How do I get a part, appliance or template to the workspace?
You
can either drag and drop it on a certain area of the upper or lower
drawing space, choose a particular tooth or area (if applicable with the
part) to set the part in place. You can optionally just click the part
once with your left-click and it will auto-place it in the workspace to
the default area. Then you can drag it to the position you like.
Note: Different
parts and appliances have various 'points' you can drag/reposition.
There will be a BLUE CIRCLE on the currently placed part/appliance to
show you what 'points' can be dragged with your mouse to reposition it.
For example a simple clasp will have may have only 1 blue circle to drag
the entire part to another tooth. An RPE may have numerous points to
adjust Arms, Wires, and Band positions. You will only see the blue
circles on whichever item is currently selected. Don't worry, the blue circles do not show on the drawing once they are submitted to the lab. If
you want to show a BAND on your drawing, just search for the "Band"
part in the library and drag/drop it onto the drawing. EasyRx also has
Crowns where you can search for "Crown" and place them on your
prescription. These are normally used for crown cantilever herbsts and
other similar appliances.
Helpful hint: Some
parts/appliance can be dragged to the Upper or Lower arch. EasyRx has
some rules in place. Such as you cannot drag an "Upper Invisible
Retainer" part to the Lower Arch. You can drag most parts to teeth on
the lower OR the upper arch.What if the part/appliance I've dragged has a blue circle and a red 'gear wheel' in it?
This
means the item you just placed also has "Part Options" you can assign
to it. If you click on the red gear wheel button on your menu bar, you
can choose that item and set additional details. For example, on a
Labial Bow you can define part options like what Type of Bow (Contour or
flat?) and Wire Size (.028 .032 etc). On RPEs, you would usually set
what type of Screw you need. On a recurve spring (sometimes referred to
as a Z spring or Mattress Spring), you will have the option to 'flip'
the part and so forth... This helps you lab hone in on every detail they
need to get your case just right.
What if I do not choose a part option?
No
worries, you can add a comment or a text annotation (discussed a little
bit further down) to the case letting the lab know what you need. If
the lab has a question, they will contact you to address any missing
details they need. Some labs are very familiar with their customers, so
if your lab knows your requests thoroughly, you may not need to include
those details.
If you are unsure that the drawing is going to
match what you exactly need, you can always add a comment, labs are
trained by EasyRx to look for these instructions on your cases
regardless of what your drawing looks like.
Templates:
Templates
are a huge time saver in EasyRx. Where instead of needing to
find/search for various parts to form your Rx, you can, in 1 click,
instantly add your most commonly submitted appliance into the workspace.
You have the ability to create your own templates OR the lab you are
submitting to can create/provide you with templates.
Your practice's templates that you've created are shown under the canvas when on the Prescription Workspace on the [Templates] tab.
You can also view all your templates and those that your Lab has designed for your practice from the [Templates] button on the left hand side. You can tell which templates are provided by your lab by looking to the right of the template name. There will be a blue circle with a letter inside.
If you'd like to create your own templates, it's very simple!
You
can drag/drop all the parts/appliances onto the drawing, designate your
part options, and even add Annotations/comments. Then you can click the
'double page' icon called [Save as a template], give your template a
name, and this will create a template for you to use anytime moving
forward! When you place a template on the workspace, you can still make
any adjustments you'd like (adjusting positions, adding clasps, removing
a comment, etc)
Help - I cannot find the part or appliance I need to make my drawing!
We
got you: We've done our best to 'standardize' the names of the various
parts and appliances that exist in the ortho world. Odds are what you
need is just named something differently. For example, a "Keeper Wire"
in EasyRx is referred to as a "Labial Support Wire". MEA's are referred
to as RPE's (we keep it old school). If you cannot find what you need,
call us and we can tell you the exact item you need to complete your
drawing! 1-888-340-3751.
If for some reason the item you need
does not exist, we are happy to develop/add it into your EasyRx account
at no cost. We are constantly working to improve your experience on the
Prescription Workspace so be sure to view our monthly update emails that
are sent to our customers-- they will also advise if there are new
appliances or parts added to your library.
If
you are in a hurry to submit a case you can use the [Text Annotation]
tool or the [Comments] tool to add in any instructions you want. Labs
that use EasyRx are trained to look for these instructions--even if your
drawing is completely blank! So if you need the lab to make you a "Quad
helix with Bands on 6s, lingual arms up to the 4s" just type it in and
submit the script. The lab will go off your instructions and if they are
not sure of something, we advise them to contact you with questions.
This should only be done for emergencies, so in the long term we'd like
to help you put templates/drawings in place so you do not have to type
instructions each time.
Your EasyRx account includes an extremely helpful live document that shows every EasyRx part and appliance that exists in the EasyRx program. This
link gets updated automatically when EasyRx releases new
parts/appliance drawings. You can access this by going to the username
drop down at the top-right, and then clicking [View Parts and Appliance
Library]
You
can download this list as a PDF to either print (very handy to keep at
your work station when creating Rxs) or just keep a copy on your
computer if needed.
This
will give you a rolling document of every part / appliance name along
with handy pictures. Go through this to find exactly what you need. You
can use the Ctrl + F key on your windows keyboard to search for any term
for example "Herbst" or "RPE" to compare a drawing with a name that
matches in EasyRx.
You can then go back into your EasyRx Prescription to find the drawing by searching for that corresponding name.
Please
note labs may not carry every single part or appliance. For example, if
the lab you submit to does not create sleep appliances, you may not
find a sleep appliance in the library when searching for one to submit
to that lab.
If you need help creating a template, give us a
buzz! 1-888-340-3751, you can even send us a filled-out copy of your
completed lab slip and our support team can help create the template and
review it with you. You can send us these templates at templates@easyrxortho.com and we will follow up with you.
Let's go back to the Prescription Workspace to review some of the icons in the menu bar.
I noticed some menu options turned red or are animating after placing a part - what does that mean?
See
the picture below. Red or animated boxes mean there are options that
you need (or may want) to configure. The Hawley Retainer in our earlier
example needed wire gauges and acrylic colors assigned, so you will see
two options I need to set as seen below. Just click on them to address
what they may need you to assign or select.
Next- Add comments or text annotations
Comments
Comments
The
"Comments" icon is the symbol with the two overlapping chat bubbles,
next to the paint brush in the picture above. A comment is a message
that you will include with the prescription that the lab will see. This
could be something like "Use best judgement for the relief" or "Bow
needs to be as flush mounted as possible to the front" or anything you
deem is important for the lab to know. Labs are also able to comment
once they have the prescription. All comments are secure, and protected
as noted in our Security page on EasyRx.
Once your case is submitted, you have the ability to add new comments and even see any comments written back from your lab.
Text Annotations
This
is the [A] icon in the menu bar. Here you can select an area on the
drawing (Workspace) that you want to type text. This is different from
Comments in that the text shows in the actual drawing and not in the
comments field. When you are done typing an annotation, be sure to press
[Enter] on your keyboard to complete the annotation. Comments are shown
to labs below the drawing Workspace almost like a note.
Helpful hint: Did
you submit a case without including important notes? You can use our
"Message Center" feature to send a message to the lab address your
concern.
Read more about our Message Center feature.
Tags - The icon with the Sales Tag w/string attached - This allows you to tag this prescription which is used in various areas of EasyRx. This is a very cool feature and will help you filter cases by tags you assign. Go here to read more about Tags.
Attaching Files / STLs / Digital Models -
Tags - The icon with the Sales Tag w/string attached - This allows you to tag this prescription which is used in various areas of EasyRx. This is a very cool feature and will help you filter cases by tags you assign. Go here to read more about Tags.
Attaching Files / STLs / Digital Models -
In
the 'Model Source' box you can attach iTero scans, check that you are
sending plaster models or impressions, or use other sources. In the
'Upload' box you can attach ANY file you like - PDFs, patient images,
allergy info
via a Word document or STL files. You will want to click the button that
says "Files from your computer". Then just browse to the file(s) to
attach it.
We also have a super handy iTero Integration to auto-attach
your iTero scans to the EasyRx prescription. You can read about to how configure and use that integration here.
What's the best way to get physical models/impressions over to our lab?
If
your office plans on sending or having the lab pickup your plaster
model/impression. There will be an option under [Model Source] on this
page that says "I am sending a plaster model / impression". Once you
submit the case in EasyRx, you will be provided an EasyRx Prescription
ID number that you can write on the box or baggie that the model is in.
We recommend writing "EasyRx Prescription ID #...then whatever the
number is. This number will match the prescription to the case in the
lab's EasyRx account. The lab you submitted the case to will then easily
be able to match your plaster model with their prescription to get your
case through production. As a bonus, this Prescription ID # lets the
lab know the patient name without you needing to disclose it on the
package. Helping keep patient data off your box/package.
You can
also print out a copy of the prescription using the 'print' button when
you are viewing the prescription after it is submitted. This will print a
nice, clean PDF you can include in the box. Writing the ID on the box
will help your office go paperless, even with plaster cases!
NOTE:
Any files you attach to an Rx will also be saved to the Patient's file.
Any data / files you save into EasyRx are backed up and secured per our
Security and Backup policies. You own all the data you upload into
EasyRx that you create, so feel free to add the files you need. Your
EasyRx plan has a Storage GB limit so be mindful of your plans
limitations. Okay I think I have a good prescription setup and I've assigned options, got my files uploaded, I'm all set - What next?
You
have a couple options---you can click [Save] at the bottom of the page.
This is handy if you need more information, if you need more
information, such as want a doctor to review before you submit, or you
are still waiting for your patient to be scanned before you submit.
Different practices find their own workflow
to manage their EasyRx prescriptions. You can always come back to the
prescription after saving it and re-edit, attach and remove files, or
add new comments or change any settings within the Rx before submitting
the prescription. This includes changing the appointment date and
assigned doctor information!
The
second option is to [Sign & Submit]. Clicking Sign & Submit
will submit your prescription to your lab. You've officailly submitted
your first prescription with EasyRx! Wasn't that easy?
If you have any difficulty, you are welcome to just call us at 1-888-340-3751 or email us at support@easyrxcloud.com. Once you finish filling out the information, click [Submit Prescription]
Woo hoo! Congrats! You sent your first RX out for processing!
The
next page you see is an overview of your Rx. There is a 'workflow' bar
that will get updated when the lab receives the Rx, when it's completed
and gets shipped. Remember once you submit a prescription and it's
checked-in by your lab, you are unable to Unsubmit the cases to make
changes or delete the Rx.
FAQ
Eek! I accidentally submitted a case that I want to take back!
We have a button for that too - you can Unsubmit the case!
Eek! I accidentally submitted a case that I want to take back!
We have a button for that too - you can Unsubmit the case!
For
emergencies, we recommend you call the lab to let them know of any
major issues or errors. You can now go relax, and check your dashboard
to see when the Rx is completed!
Be sure to check out other cool options like Downloading the Rx as a PDF, sharing the PDF with colleagues, or adding tags. These are all options we cover in other tutorials. Take a look below at a few frequently asked questions and let us know if we can further help you.
Be sure to check out other cool options like Downloading the Rx as a PDF, sharing the PDF with colleagues, or adding tags. These are all options we cover in other tutorials. Take a look below at a few frequently asked questions and let us know if we can further help you.
What about support - do I get live support and how do I reach you?
We have numerous resources for our customers to keep you up to date with everything new and guide you in any questions you have. •
We have numerous resources for our customers to keep you up to date with everything new and guide you in any questions you have. •
- EasyRx offers implementation training to help you get started with your account.
To schedule email: support@easyrxcloud.com - Our Help Center is a great resource to read Knowledge Base Articles, ask for community advice, and open
a chat with our support team. You can find the help center under the "Contact Support" tab or at : https://support.easyrxortho.com/portal/home - Check out our Youtube Channel for informational videos we call EasyVids: https://www.youtube.com/channel/UCDMWNKf9UhTpkkIBt1EUtcg
- Contact our support team at:
Email: support@easyrxcloud.com or
Call or text: 1-888-340-3751
We also love feedback and comments from
customers so let us know if there is anything we can do to better your
experience.
I'd like some live training or need some extra help with getting started - what can I do?
Call or email us to schedule a remote training with you and/or your staff. We typically do training remotely and can walk through any and all items your EasyRx account offers. Maybe you just got a new staff member? Perhaps you are a little rusty on your EasyRx usage since you last logged in? Let us put together a training that works with your busy office's schedule. Call 1-888-340-3751 or email us at support@easyrxcloud.com. No robots, just good service.
What Software Integrations does EasyRx offer?
EasyRx is an open platform that has integrations with practice management, intra-oral scanners, and 3D printers. EasyRx currently provides practice management integration for with Dolphin Imaging and Management, CS Orthotrac, Cloud 9, topsOrtho, Ortho2 Edge, Oasys, Focus Ortho, Wave Ortho and Patterson Eaglesoft. EasyRx integrates with iTero® MyAlignTech and TRIOS® via the 3Shape Communicate™ software (other scanner software integrations pending). If your practice is 3D printing, EasyRx offers integrations with Form Labs, EnvisionTEC, MoonRay, Nextdent, and Miicraft. See all of our integrations here.
Related Articles
A Step-By-Step guide on using EasyRx for your EasyRx Lab
Introduction: Before you get started, it's important to know the architecture of EasyRx- it is a cloud-based platform meaning you can access your account from virtually anywhere, from any device, at any time. We only require you to have an internet ...Creating Doctor accounts and establishing connections to practices from your Lab account
When getting your lab started, there are a couple ways to get your clients to start sending you cases through EasyRx. Scroll to the appropriate sections below Option 1 covers how you as the lab can create the practice account Option 2 covers how you ...Getting Started with EasyRx Practice - EasyVid Video Series
Welcome to the EasyRx EasyVid Learning Series. Below we have video links to get you acclimated with your EasyRx account. Brew up your favorite cup of coffee or tea and dive into your EasyRx account! Remember we are always here to help, need a ...EasyVid Video Series: EasyRx 3D Edit Videos
Welcome to the awesome EasyRx 3D Edit EasyVid Video Series These videos will guide you on how to use nifty cloud-based EasyRx 3D Edit software to open, view, trim, base, label, and save your STL files/digital models. Prerequisites: EasyRx 3D Edit is ...Integrating EasyRx into your Practice Prescription Workflow
Welcome to EasyRx - one of the most powerful platforms to streamline and better manage your lab prescription workflow! One the biggest questions we get asked is "What's the best way to integrate EasyRx with my practice(s)?" Good question: Your staff ...