Written Check-In (Processing cases from Non-EasyRx practices)
One of the most powerful features of your Enterprise Lab account is the ability to do Written Check-Ins of Prescriptions from Practices that are not currently using EasyRx to submit cases to you.
What is a Written Check-In?
It is the process of taking lab slips / prescription forms that your customers have sent you, and entering them into your EasyRx lab account. This includes faxed, emailed, mailed Rx slips that did not originate from an EasyRx created prescription. By doing a written check-in, you can create a prescription internally and even scan the paper Rx as a support document to it, consolidating all your Rxs into your EasyRx Lab account. You will also be able to invoice the practice directly in EasyRx. See the benefits below for more details.
What are the benefits of doing Written Check-Ins?
-Allows your lab to Invoice practices from your EasyRx Lab account even if the practice is not using EasyRx
-Process and manage Rx's in EasyRx regardless if it's a PDF or a traditional written lab slip, includes adding a copy of the paper/PDF Rx to the case and any digital models.
-Creates an Rx History for your practices, allowing you to come back and view cases as a running history
Another huge advantage is as you process written check-ins, the Rx information is stored securely to that practice's record. Meaning that if the practice/doctor ever decides to sign up to use EasyRx, you can invite them to access to all their previous prescriptions, invoices, and supporting STL files/documents the moment they sign up! They can then submit cases to you from that same account, generate reports, view the tracking of a case, communicate with your lab securely, and much more. The doctor can even request remakes or repairs in their EasyRx account from these prescriptions regardless of how old they are.
How to use the Written Check-In function
To get started, you will need to have the practice record created before you should start processing written check ins. You can view all practice's you've added a record to your Lab account by going to the [Practices] tab. If you need to create a record, click on [Create Practice]. If you need help creating this or have a very large volume of practices to manually enter, email us at support@easyrxortho.com or call 1-888-340-3751 to get instructions on how we can mass-import the data for you.
Let's get started!
First, physically gather the prescription(s) that have been sent to you from your practices. These can be PDFs, paper slips, faxed copies, etc. We recommend have a pile/stack so that a lab employee can quickly add these into your EasyRx Lab account.
Login to your EasyRx Lab account, then highlight the [Workflow] menu option with your mouse. Then select from the drop-down [Written Check-In].
Go ahead and start inputting the information as shown below from the Paper Rx / Slip.
Once you click [Check-In Prescription] you will be taken to the View Prescription page. At this point, you've internally created an Rx for this practice. There is now a unique Prescription ID number assigned to this case. We recommend writing the EasyRx Prescription ID number somewhere on the Paper Rx. Usually labs will write this at the top left or top right of their Paper Rx. Make sure the Prescription ID is legible / bold so that later in the process it can easily be read.
Cool! The next step is Editing the Rx to match the Paper Rx the practice sent you. This is important because by editing the Rx to match, you it will allow you to properly invoice the case. You will need to make sure you already have pricing configured on your parts / appliances / model services and so forth. If you haven't done so you, you can do this from your [Configure] tab.
Depending on your lab's workflow, you next can either:
A) Have the person who did the initial Written Check In go ahead and Edit the Rx to design the case in EasyRx.
B) Go back and start Written Check-In for the remaining non-easyrx cases. Hand the paper Rx(s) with the EasyRx Prescription ID over to the next workstation or employee to design the case. The next person will go into your EasyRx Lab account and design the Rx to match the paper Rx.
Let's go ahead and Edit the Rx
You will now be on the Prescription Workspace. Here you can design / put together the appliance as the practice has shown on the Paper Rx. We highly recommend having Prescription Templates already put together to quickly add to the Rx.
If you do not have any Templates ready, you can easily find the appropriate parts/appliances in the Universal Library to drag/drop onto the canvas. You will have the option to save the drawing as a template for future use, which will help build your templates library as you process cases.
We recommend adding any notes, special instructions, comments, part options, services to the Rx so that your Standard Price will reflect that of the Invoice that will eventually be generated. Don't worry, items like Tax and Shipping will be calculate at the time of invoicing and are not reflected in the Standard Price. Click the Refresh symbol next to Standard Price to update the price with any changes you made. You can also use the grid icon next to Standard Price to see a breakdown of how the price is currently calculated. You may add discounts or misc. charges or discounts by using the Wrench icon in the Canvas menu bar.
Be sure to upload any STL files or supporting documents the practice may have sent you on the case. This will help attach those supporting documents to the case should you need to come back and reference them. It will also be available to the doctor down the road if they decide to sign up for EasyRx, giving them instant access to their files from previous cases. You do not have to attach a copy of the paper Rx here in the uploads section, we have a neat Batch Scan feature that will help you attach copies of the paper Rx further into the process.
Once the Rx is matched to the Paper Rx, you can click the Diskette icon which is the Save button.
Then we recommend clicking the Print Rx icon. You will want to print a copy of the EasyRx Prescription to include with your bin / tray. Our Printed PDF in EasyRx includes a handy Barcode which will expedite both the Check-Out process and Batch Scan should your lab use a Barcode reader.
You / the employee doing the designing can click the Folder icon in the canvas menu bar to open up another Written Prescription that needs to be designed or just save and move on to another task.
Helpful Note: That being said - We recommend you have a USB or Wireless Barcode reader. It will make the EasyRx experience very smooth, especially during the busy seasons! Amazon.com has some great options that are very cost friendly.
Once you have all your paper Rx's completed as part of the Written Check-In process:
Depending on your workflow, you can likely proceed getting the cases into production to have the appliances created. Once the cases are ready to Check-Out, the person doing the Check-Out can go to the Check-Out page in EasyRx. This is where a barcode reader can come in handy! You can also designate shipping method and package specifics here.
Enter the Prescription ID number or using your barcode reader, select the field to enter the Prescription ID for checkout. Type or scan the barcode on the EasyRx Prescription for the respective bin / case, then click Check-Out. Once they are Checked-Out, you can go ahead and Generate the Invoices. If you need to edit a generated invoice, remember you can find/edit generated invoices from the [Invoices] menu option at the top of your page.
Batch scanning the Paper Rxs to their respective case:
We recommend taking all the paper prescriptions, which from earlier you've went ahead and written an EasyRx Prescription ID number on it, and feeding it as a batch into a scanner. You will want to format it as a PDF for the Batch Scan to work properly. You are essentially taking all the Paper Rxs and creating 1 rolling document that contains all the paper Rx's for the day.
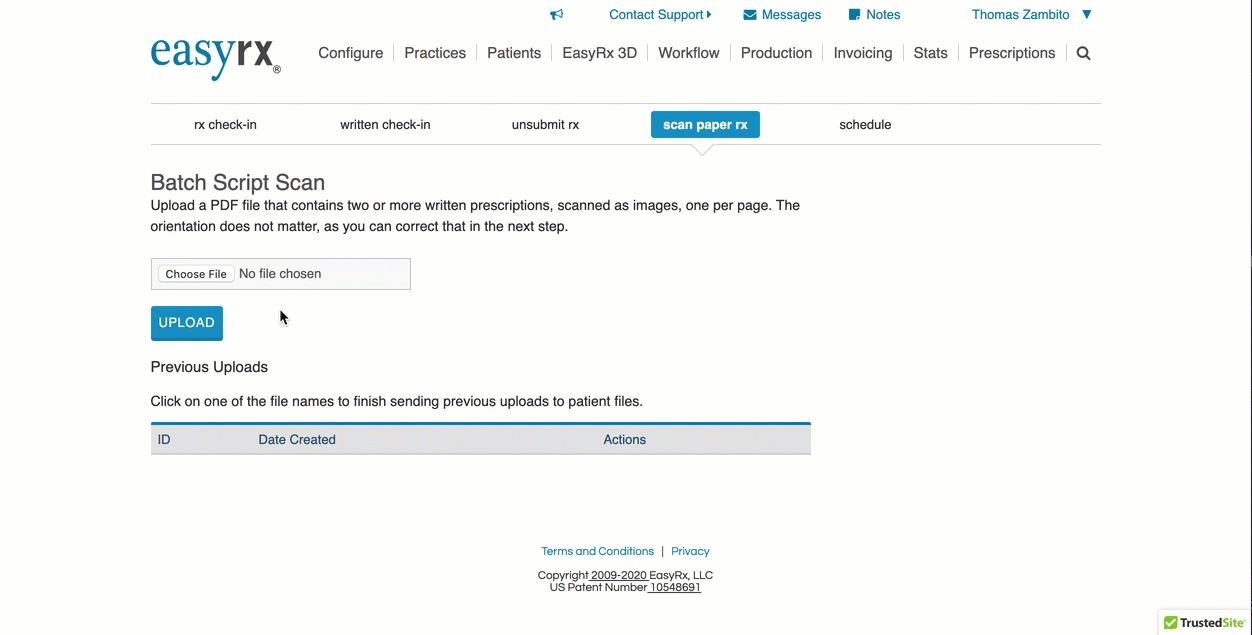
In your EasyRx account, go to [Workflow] then select [Check-In], then select the Scan Paper Rx sub-tab.
Then select [Choose File]. You will want to select the PDF you generated from scanning all your Paper Rxs. Once selected, click [Upload]
Next, you will see images of each page of the PDF and hopefully the ability to read the EasyRx Prescription ID you wrote on the form!
Now you can put in the Prescription ID in the [Enter script ID] field. You can also [crop] each page to make the data-entry process easier by not seeing the entire document. Don't worry cropping will not crop the actual image/document, it only crops it to view on this page.
Scroll down and type in the Prescription ID for all the cases you've scanned. Once you are done, click [Send Home] at the bottom of the page.
That's it! Once you've clicked Send Home, the EasyRx Prescription will have a copy of the Paper Rx image attached to it
.
The Paper Rx will also show on the Patient's Record in EasyRx. We know this was quite a bit of information however once you perform this a few times, it get's much faster. We have a few Frequently Asked Questions at the end you can check out.
FAQ
The Scanned Rxs are too small or I cannot read the EasyRx ID that we wrote, how can I fix this?
The Scanned Rxs are too small or I cannot read the EasyRx ID that we wrote, how can I fix this?
This is usually a formatting issue. Naturally, make sure you write the EasyRx Prescription ID both bold and large enough to read. When scanning the Rx, make sure the scanner you are using is not re-sizing the pages or making them smaller. If your lab slip is small by design, try using a zoom or enhancement feature from your scanner to get a larger resolution.
How can my customer's access their EasyRx data?
They will need to sign up for EasyRx. The easiest way to do this is go under [Practices], find the respective practice, then click [Invite]. This will email them a link to sign up for an EasyRx plan. Once they are signed up, the account they will access is essentially the same one you've processed the Written Rx's into! Meaning they can see all previous cases, scanned paper rx, attached digital models, invoices, etc! We offer free training and can help the practice get started. If you'd like to give us a heads up at 1-888-340-3751, and we can follow up for your lab to demo the software to your practices before they join.
Once they are signed up, they can move forward with sending you cases directly in EasyRx, thus eliminating the need for your lab to do Written Check In's for that practice!
I need additional help - can you guys at EasyRx assist?
Absolutely, we are happy to walk you through the process and even do a screen-share support session to help you out. Give us a buzz at 1-888-340-3751 or email us at support@easyrxortho.com to schedule a time to do this with your lab.
Related Articles
Automated Bracket Removal (ABR) Processing Options
Automated Bracket Removal (ABR) File Processing Options For customers using Automated Bracket Removal (ABR), we added some options to give you the flexibility to control which files do or do not get processed by Automated Bracket Removal. If ABR is ...How to track Invisalign cases through EasyRx
We've added more features to the Invisalign Tracker Lab, to better support and track Invisalign cases. See the enhancedInvisalign Tracker Lab at https://support.easyrxortho.com/portal/kb/articles/in This guide will show your EasyRx Practice account ...A Step-By-Step guide on using EasyRx for your EasyRx Lab
Introduction: Before you get started, it's important to know the architecture of EasyRx- it is a cloud-based platform meaning you can access your account from virtually anywhere, from any device, at any time. We only require you to have an internet ...December 2017 - EasyRx Update and Newsletter
Welcome to the December 2017 Update and Newsletter. The last update and newsletter of 2017. We wanted to get one more update out the door this year, before we hit the ground running in 2018. Big New Enhancements in this update New EasyRx Support ...Message Center for Labs and Practices: How it works
As of June 2016, EasyRx now includes an awesome Message Center that includes a way to communicate with other EasyRx users. It's included in all EasyRx Practice and Lab plans. This article will help both labs and practice understand how to use this ...