EasyRx 3D - View and Edit STL files / Digital Models
EASYRX 3D - THE NEXT GENERATION OF 3D SOFTWARE
Prerequisites
EasyRx includes EasyRx 3D — the next generation of 3D software. No need to download software to view and base your 3D models any longer. Whether the file is from an intra-oral scanner, cone-beam or from a digital study model service from a lab, EasyRx 3D provides you a fast and efficient solution to view and base these files.
- 100% Cloud – no software download to view, trim and base your 3D/STL files
- Compatible with industry brands like iTero, TRIOS and Carestream
EasyRx 3D View
- Quickly and easily view standard 3D STL files inside your browser
- Includes built-In STL File Optimizing Features
- Compatible with standard browsers like Chrome, Safari, Firefox, IE
EasyRx 3D Edit
- Trim and base STL files
- Add regular and hollow bases
- Set base height and wall thickness on hollow models
- Add labels to models, like patient name, date, Rx number, practice name
- Cut base after base is applied
- Saved based STL files
- Quick and easy access to saved STL files via EasyFS. EasyFS is a unique file access system providing secure, direct access to files outside of EasyRx, like 3D printer software
NOTES:
- EasyRx 3D View is a standard feature in all EasyRx Practice and EasyRx Lab plans.
- Easyrx 3D Edit is included in EasyRx Practice Standard and Premium plans and EasyRx Lab Standard, Premium and Enterprise plans. 3D Edit is scheduled for release May 2017
- EasyRx 3D View is supported on Firefox, Chrome, Safari and IE.
- EasyRx 3D Edit requires a 64 bit computer
- EasyRx 3D Edit requires Firefox browser (right now, Firefox does a better job with WebGL and WebAssembly, which are integral to 3D, as well as handles floating point math calculation faster).
Opening EasyRx 3D
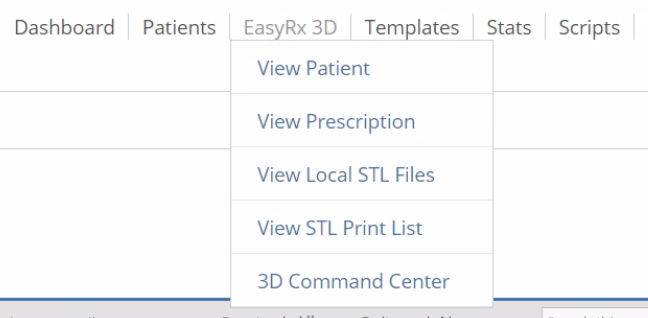
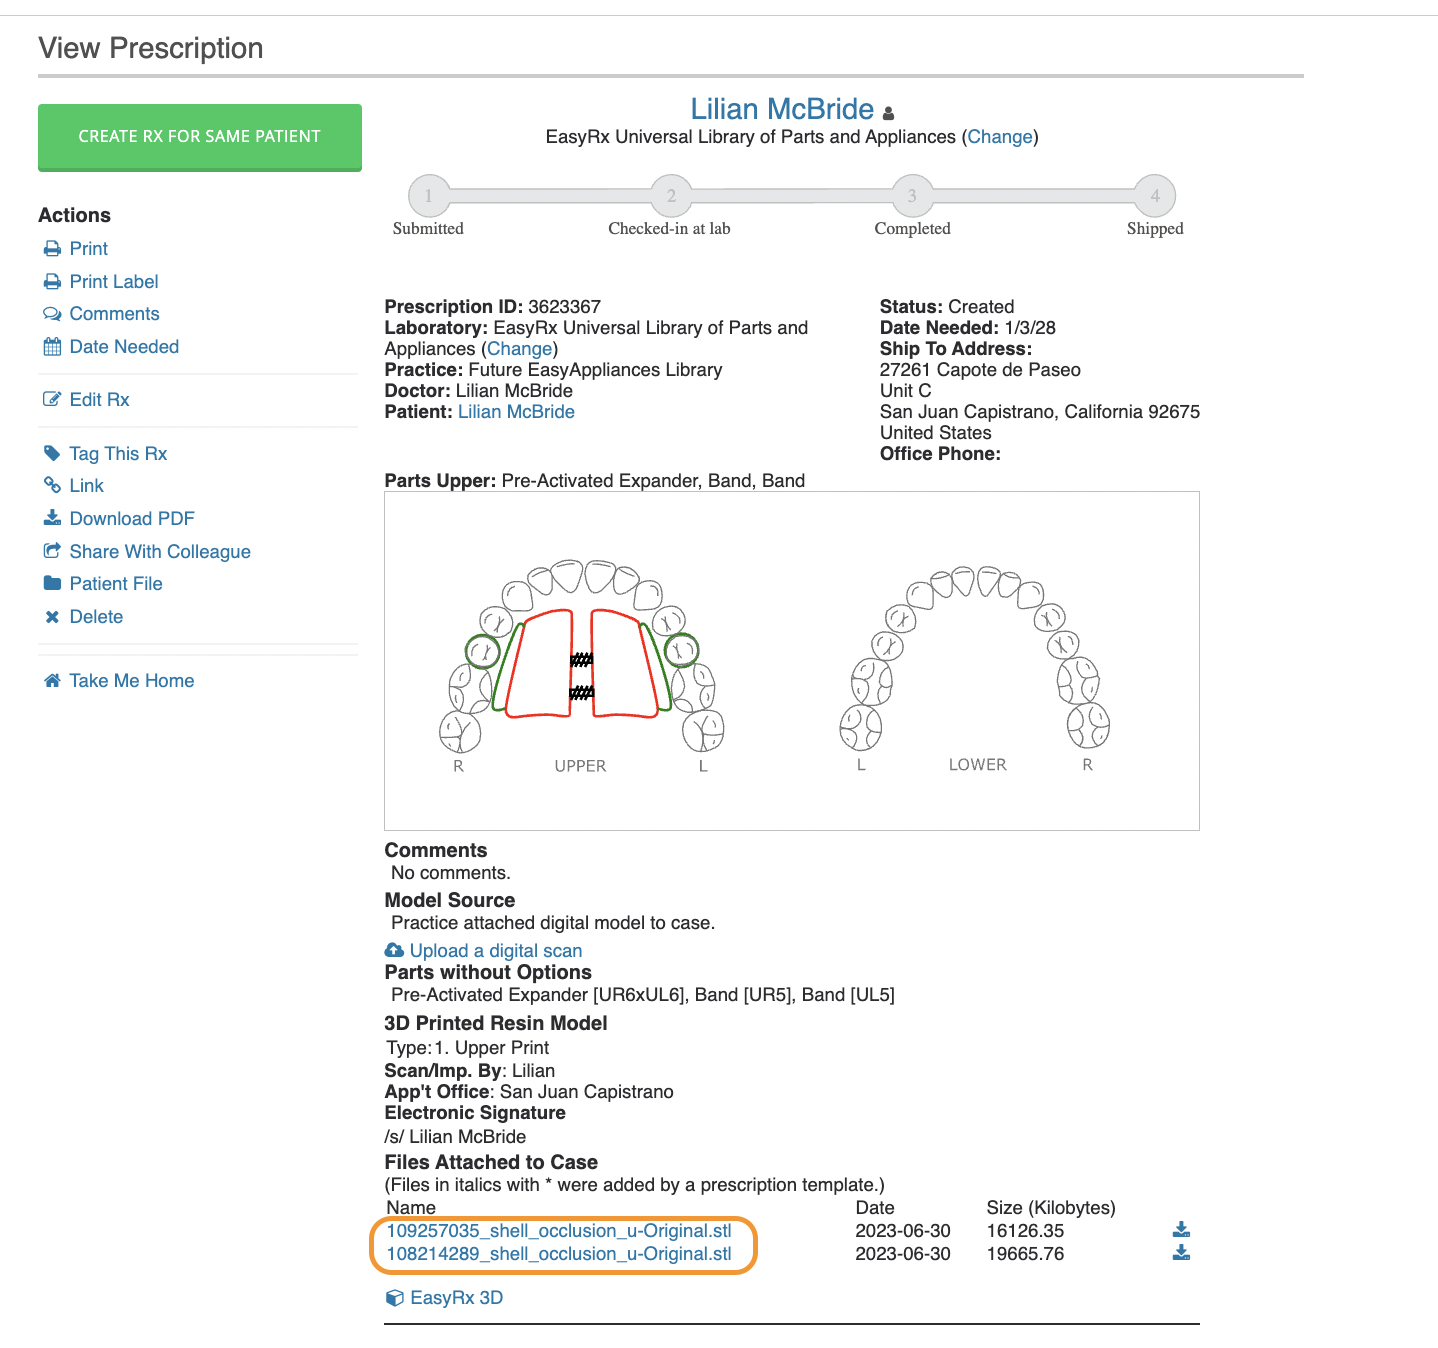
EasyRx 3D is integrated throughout EasyRx. You'll can access EasyRx 3D here:
-From the Main Menu Bar:

From the Prescription Workspace:

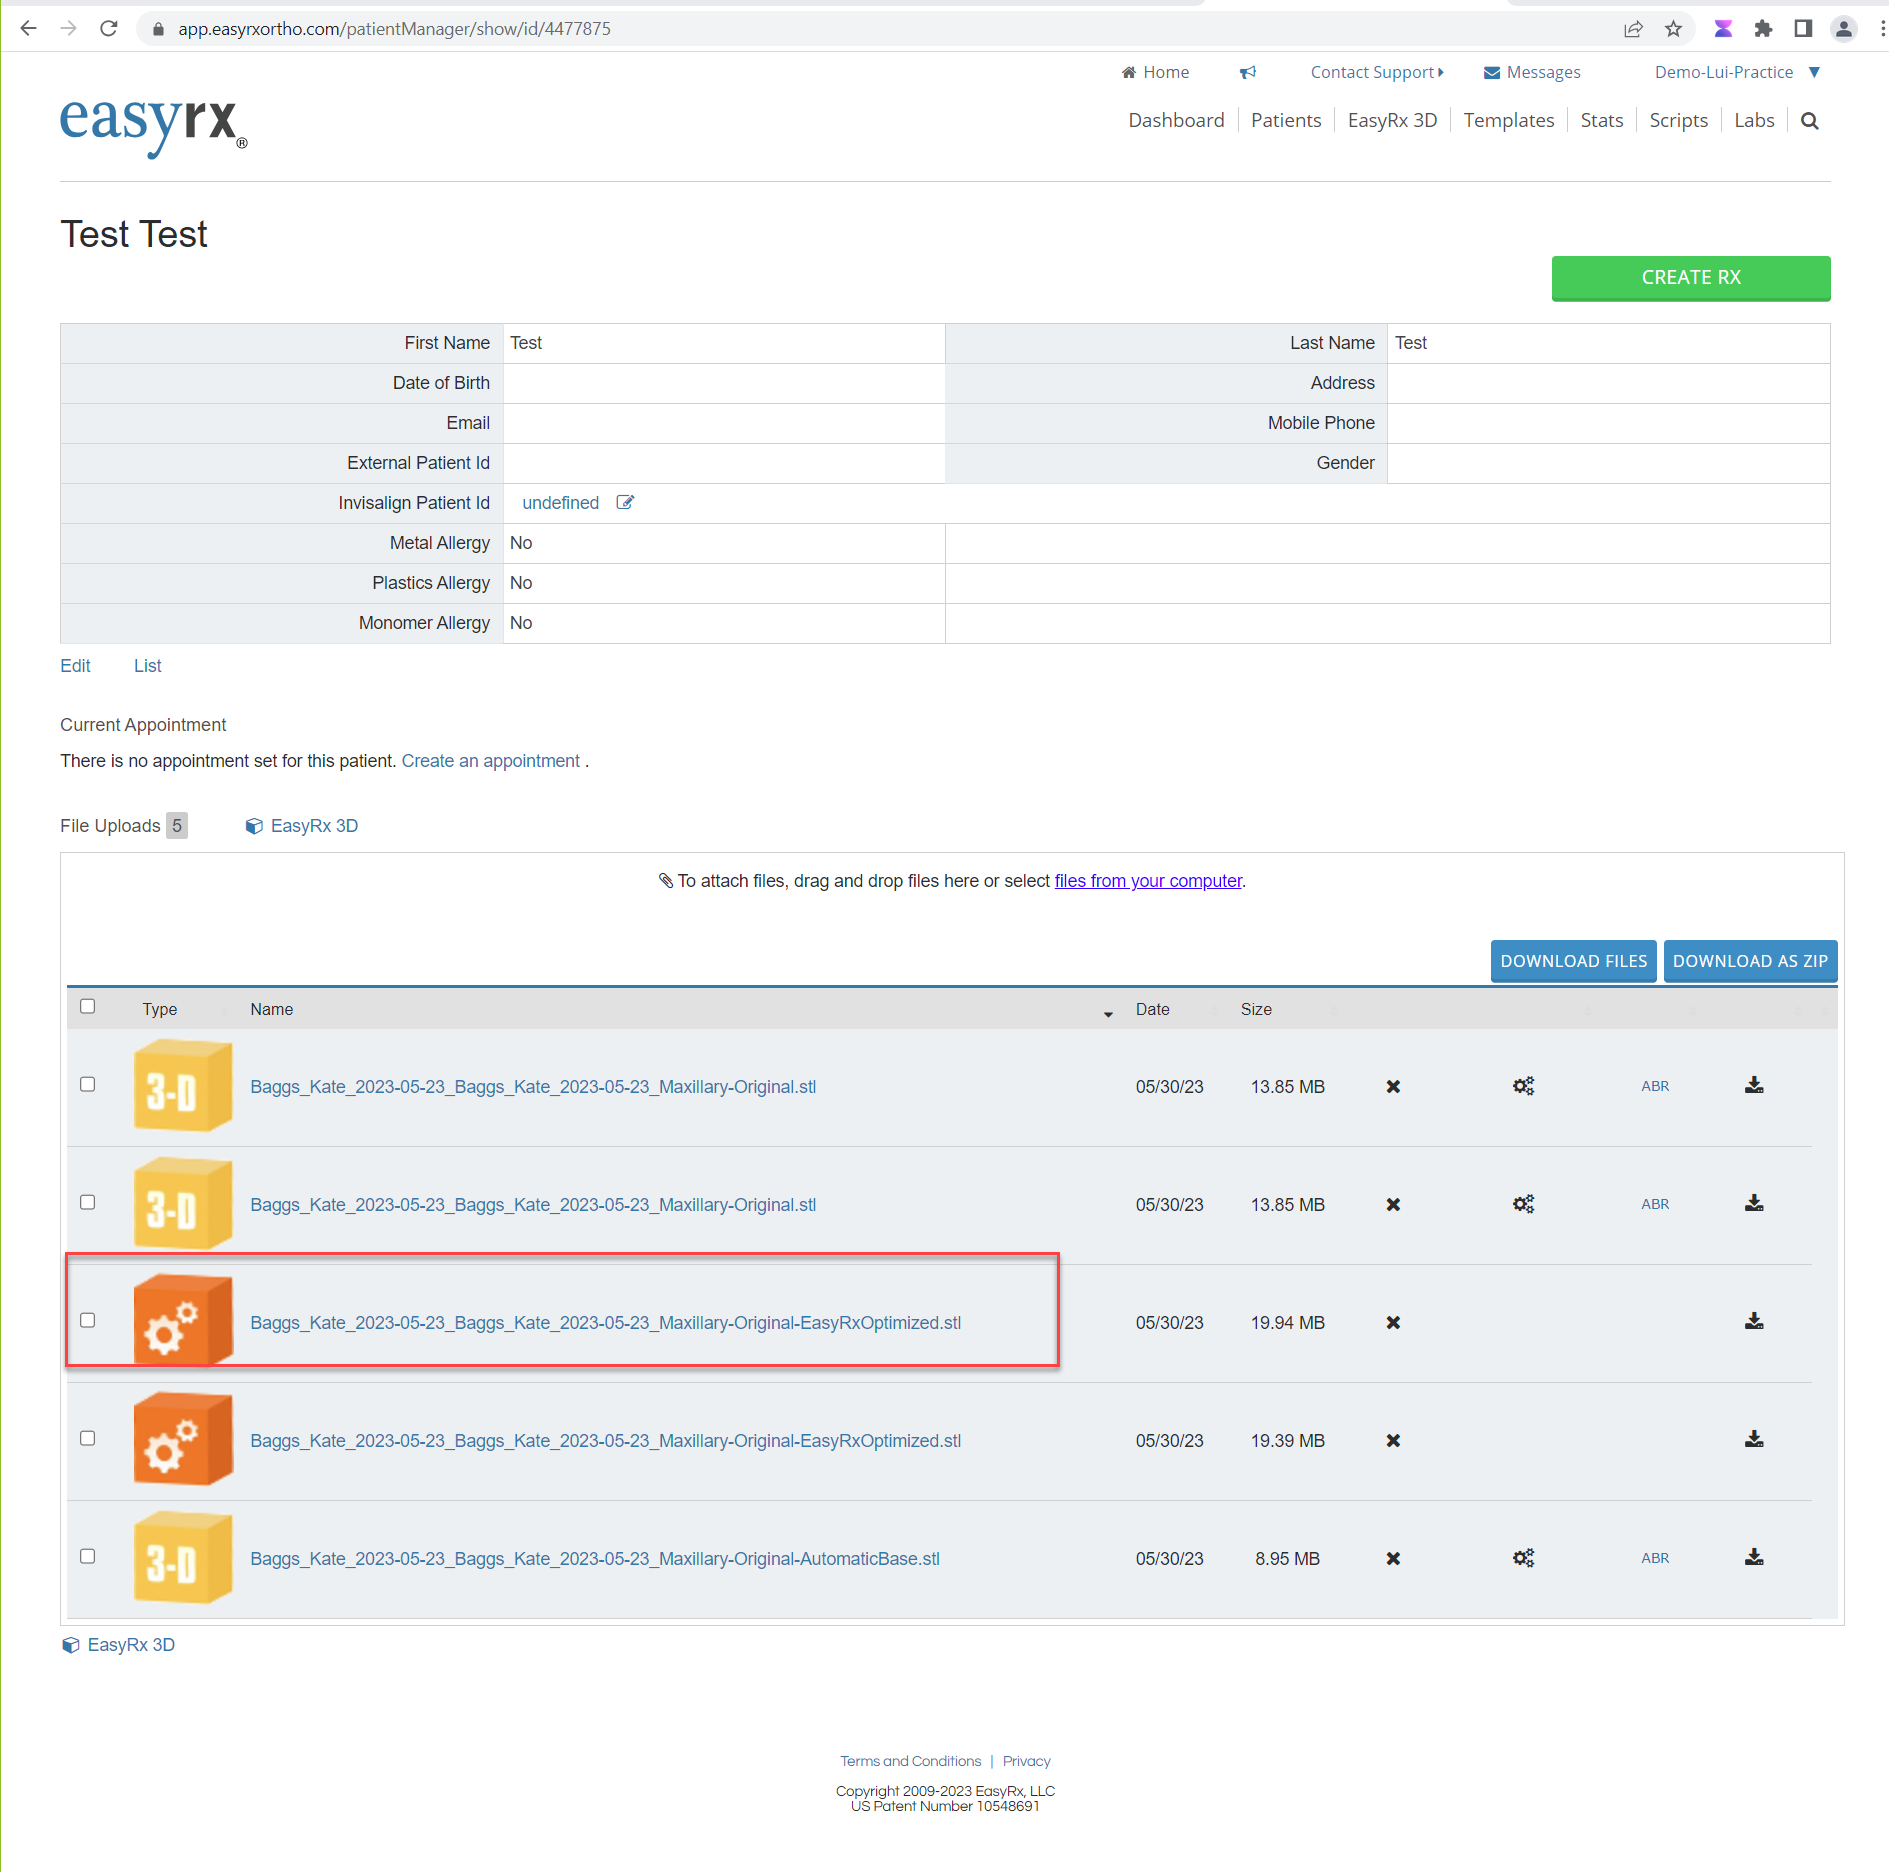
When viewing the File Upload section for a Patient:

When viewing the list of files on the File Upload tab, the following options are available.
EasyRx 3D is integrated throughout EasyRx. You'll can access EasyRx 3D here:
-From the Main Menu Bar:
From the Prescription Workspace:
When viewing the File Upload section for a Patient:
When viewing the list of files on the File Upload tab, the following options are available.
| Option | Description |
| 1 | Click the file name allows you to open the STL file, you can open the file View mode or Edit model |
| 2 | Deletes the file |
| 3 | Scrubs the file. Read the File Scrubbing KB article here |
| 4 | Scrubs and remeshes the file. Recommended before basing |
| 5 | Downloads the file to the default default folder on the browser |
Opening EasyRx 3D - View or Edit
When EasyRx 3D is opened from a RX or from the patient, a listing of all STL files displays. Scroll through the list and click on the file or files to edit
When EasyRx 3D is opened from a RX or from the patient, a listing of all STL files displays. Scroll through the list and click on the file or files to edit
- If one file is selected, both View and Edit are available
- If two files are selected, only View is available
- If you click on a file from the list of STL files for a patient, you can choose to open in View or Edit model
Opening EasyRx 3D from the menu bar
When EasyRx 3D View is opened from the main menu bar, a menu screen is displayed, with three options available:
| Option | Description |
1 | Allows you to lookup a patient and View/Edit or attach STL files to this patient |
2 | Allows you to lookup a prescription and View/Edit or attach STL files to this prescription |
| 3 | Allows you to browse to local STL files and open for viewing. Upper: Click the link and browse to the upper STL file stored locally for viewing Lower: Click the link and browse to the lower STL file stored locally for viewing User this option to view STL files for a patient without having to add a patient record to EasyRx. |
EasyRx 3D View
Opens a STL file in EasyRx 3D View allows you to view the STL file. When Viewing STL files, in either View or Edit mode, the following options are available:
The Task Pane includes these options:
Opens a STL file in EasyRx 3D View allows you to view the STL file. When Viewing STL files, in either View or Edit mode, the following options are available:
The Task Pane includes these options:
| 1 | Increase the model size by clicking the + / - buttons on the task panel or by scrolling the roller ball on your mouse up and down |
| 2 | Move the model around the screen by clicking the left, right, up and down buttons or move the model by holding down right click on the mouse and moving the model |
| 3 | Quickly orient the model using the Left, Right, Top, Bottom, Front and Back buttons |
Apart | Separates the upper and lower models, if two models are opened |
Also, you can spin the model as needed by holding down the left mouse button and moving the model around
EasyRx 3D Edit
A STL file opened in Edit model displays the model with orange "trim points" which can be adjusted as needed
And the Task Panel shows the available edit options:
A STL file opened in Edit model displays the model with orange "trim points" which can be adjusted as needed
And the Task Panel shows the available edit options:
EasyRx File Optimizer | Click to Optimize the STL file. The file will be automatically optimized. You'll need to close EasyRx 3D and open the optimized file once the process is completed. This usually takes a few minutes. The new file will have the extension "EasyRxOptimized" in the file name. |
Orient Model | Orienting the model is required to do a hollow model or after trimming a model using EasyModelTrim or if EasyRx 3D detects the models needs orientation. To orient a model click the left molar, between the first anteriors and click the right molar. |
Trim Model | Use the Trim Model tools to trim / clean-up the model before Basing: Trim Model: After adjusting the the trim points, click Trim Model to trim the model. Adjust Trim: Returns the model and trim points to the most recent state before trimming the model, allowing you to adjust the trim points as needed Restore Original Trim Path: This is "start over". This restores the trim paths to the position on the original saved model EasyModelTrim - EasyModelTrim allows you to re-trim the entire model. When selected, the existing trim points are removed. To trim the model, you can click around the model or hold down [ALT] and the left mouse button and drag the mouse to draw the trim points. More information can be found in the EasyRx 3D Edit video series |
| Add a Base | Regular: Adds a regular base Hollow: Adds a hollow base Base Height: Allows you to define the preferred base height: Thinnest: EasyRx 3D determines the thinnest base height for this model. 2, 4, 6, 8 and 10mm: The base height is set to the chosen height Custom Base Height: When chosen, a base pan is displayed, which can be adjusted to the desired base height NOTE: To simplify trimming and basing model, the add base process also trims the model. You can adjust trim points as needed, choose preferred base type and click "Add base" and the model is trimmed and based. |
Wall Thickness | Only required for Hollow models, choose 2, 3 or 4 MM |
| Cut Model | Displays a cutting pane which can be adjusted to cut the model before basing. For example, you can position the cutting pane just behind the molars to cut off the back on the model, allowing it to be placed up right ("St Louise Arch style") for printing. NOTE: The cutting pane only works with Regular models |
| Undo Add Base | After a base has been placed on the model, you can start over by choosing "Undo Add Base" |
| Add a Label | After a base has been placed on a model, up to two labels can be added These data files are available: Rx Number: The EasyRx RX number Patient Name: The name of the patient Patient Initials: The initials of the patient Bin Number: The bin number assigned to the case Practice Name: The practice name - uses the practice name from Account Settings Custom Text: You can enter free form text, like today's date Position First Label: Choose the data fields for the first label then click Position First label to position the first label Position Second Label: Choose the data fields for the second label, click Position Second Label to position the second label Add Label: - Click to add the label Undo Add Label: Click to remove the label(s) and start over NOTE: On regular base models, the label is engraved On Hollow base models, the label is embossed |
| Save Model | After trimming, basing and labelling a STL file, click Save Model to save the new file. The files is saved to the Patient's File's. The file name defaults to: The Patient ID_Base Type(X) with X being a count of each base created. You can change the file name by clicking in the file name box and using the backspace, arrow and delete keys to remove the default file name and enter the new file name. |
Steps to trim, label and save a Base
- We recommend running the "Optimize" tool before basing a model
- After opening desired model
- Adjust trim points, either individually or using EasyModelTrim
- Choose desired base type, height and wall thickness (if hollow model)
- Add base
- Add labels
- Save the model
- Use EasyFS to open the based STL file via third party software, like 3D Printer software
Related Articles
How to view STL files / 3D Models
3D models can be viewed in our EasyRx 3D web viewer. The viewer can be accessed from the view page or the Rx workspace. On the view page simply click the the check box next to the files you want to view and click "preview". On the workspace click the ...EasyVid Video Series: EasyRx 3D Edit Videos
Welcome to the awesome EasyRx 3D Edit EasyVid Video Series These videos will guide you on how to use nifty cloud-based EasyRx 3D Edit software to open, view, trim, base, label, and save your STL files/digital models. Prerequisites: EasyRx 3D Edit is ...Carestream CS3500 scans - How to Export and Import into EasyRx
If you are using a Carestream CS3500 digital scanner, use this article on how to properly export your STL files, then import them into EasyRx. Export .STL file(s): Locate the patient scans / files in your Dental Imaging Software. Click the [Send To] ...3Shape / Trios scans - How to Export and Import into EasyRx
If you are using a Trios digital scanner by 3Shape, use this article on how to properly export your STL files, then import them into EasyRx. Note: You will need a license or an installed copy of Ortho Analyzer software in order to export the scan. We ...iTero Scans - How to manually Export iTero scans and add them into EasyRx
If you are using an iTero digital scanner, use this article on how to properly export your STL files, then import them into EasyRx. Helpful hint: Did you know EasyRx now integrates with MyAlignTech to automatically attach your scans? Read more here ...